Choosing the right kitchen shelves is just one of the many aspects that you should take into account when designing a perfect kitchen. Regardless of whether you are purchasing additional storage or redesigning current ones, the depth of your shelves does matter. Not only does it determine how much storage space you have, but it also determines how convenient your shelves are to use and arrange. Below, we’ll explore everything you need to know about choosing the right depth for your kitchen shelves, including DIY options and styling tips.

Continue reading – 11 creative Ideas to Transform the Space Above Your Kitchen Cabinets
Why Shelf Depth Matters in Kitchen Design
Understanding factors such as the depth of your kitchen shelves is one of the key factors that can help you in designing shelves that are functional, as well as, beautiful. If the shelves are too deep, it will be difficult for you to get to the items on the rear side of the shelf. On the other hand, if the shelves are too shallow, they cannot accommodate the required number of items to be stored on them.
A proper choice of the shelf depth means that you will be able to use all the space possible while still being able to reach everything the shelves hold. In short, the right shelf depth makes your kitchen more organized and easier to use.
TIP: Before deciding on the depth of your kitchen shelves, take a moment to think about what you plan to store. This will help you choose the right size.
Standard Depths for Kitchen Shelves

Wall-Mounted Shelves
One of the most popular types of shelves in the kitchen is wall-mounted shelves that may refer to the upper cabinets. Standard wall-mounted shelves typically have a depth of 10 to 12 inches. This is the right depth that can accommodate the plates, glasses and other items that are used in the kitchen on a daily basis. However, if the shelves go any deeper than 12 inches, they may start to look bulky and make it difficult to access items.
Base Shelves
Base cabinets or pantry shelves are a bit deeper with their depth that can vary from 16 to 24 inches. This extra depth is good enough for storing large appliances such as mixers or blenders and also big items such as pots and pans. But, to overcome this problem, there are pull-out baskets or lazy Susans that can be implemented to reach out the organizational items in the back.
TIP: To avoid clutter and difficulty accessing items, try to use shelf dividers or sliding mechanisms on deeper base shelves. These helps keep everything organized and easy to grab.
Customizing Shelf Depth for Your Needs

It is clear here that when it comes to the shelves in the kitchen, one cannot presume that a particular design works for all kitchens. Depending on your unique storage needs, you may need to adjust the depth. For example, if you’re using a shelf to store your dinnerware, a 10 to 12-inch depth works well. However, if you are going to store cookbooks, or decorative pieces or some of the larger kitchen utensils, a 14-inch shelf might be more appropriate.
For spaces where you store smaller items, like spices or mugs, shallower shelves of 8 to 10 inches can keep things within easy reach without wasted space.
How Shelf Depth Impacts Kitchen Workflow
The depth of your shelves plays a big role in how smoothly your kitchen operates. If shelves are too deep, items may be out of sight and out of reach. It could also result into loss of items, clutter, and a lot of time spent looking for items that may have been misplaced. Shelves which are built too narrow on the other hand will not offer sufficient space to accommodate all the required goods.
Shelves that are 8–10-inch deep are more appropriate for storing frequently used items because everything is within easy reach. Thereby, wooden kitchen shelves that are of such depth offer the best solution to this problem. Deeper shelves should be used to store items that are used less often, or you should use pantry style storage where you are able to use containers or baskets to organize things.
TIP: When organizing deeper shelves, always place the items you use most frequently toward the front. This will save you time when cooking and cleaning up.
How to Maximize Shelf Space with the Right Depth
Utilize Shelf Dividers
Shelf dividers are helpful if you have deep shelves as they take the area and divide it into sections so that it becomes easy to manage. These are particularly useful for separating pots, pans, and cutting boards on base shelves. Shelf dividers can also ensure that items are not shifted close to the back where they are most difficult to access.
Stackable Solutions
For the shelves that are deeper, one might use stackable containers or risers for a shelf. These allow you to take advantage of vertical space without making the shelf feel overcrowded. Using stackable storage bins can help keep smaller items like snacks or kitchen gadgets easily accessible.
Sliding Shelves
Sliding or pull-out shelves are a fantastic option for deeper cabinets. With sliding shelves, you can pull the entire shelf forward to see all the items at once, making it much easier to find what you’re looking for. These are perfect for storing heavier items like pots, pans, and small appliances.
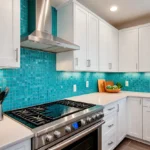
Shelves for Open Kitchens: Aesthetic Considerations

Open kitchen shelves have become increasingly popular for their sleek and modern look. However, the depth of these shelves is important for keeping the space open and airy. Open shelves kitchen that are too deep give a congested look to the kitchen and the flow of the kitchen area looks cramped. A depth of 8 to 10 inches works well for open shelving which allows you to display your favorite items while keeping the kitchen looking clean and spacious.
TIP: If you’re installing open shelves, consider using them for decorative items and light storage. Use shallower shelves for display purposes and deeper shelves for hidden storage.
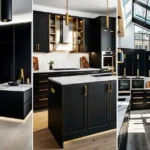
Ideas for Styling Open Shelves
Open shelves offer a great opportunity to combine style and function. Here are some kitchen shelving ideas to inspire you and help you style them creatively
- Color Coordination: For better aesthetic value, make sure to stack plates with glasses or arranged utensils with trays of similar hues.
- Mixed Materials: Use wooden, metallic, and ceramic objects such as picture frames or pots to enhance the texture.
- Vertical Stacking: Put stacks of plates or bowls on the wall and arrange them in the most orderly manner to create a good looking interior.
- Greenery: For a more appealing and natural look, include small plants or herbs on the table.
- Decorative Pieces: Add a few decorative items such as vases or framed artwork with a taste of the homeowner’s preferences.
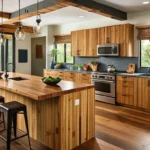
Floating Shelves vs. Traditional Shelves
Floating shelf can add a sleek and elegant finishing and are perfect for use in kitchens that are small. These shelves are normally not as deeply enclosed in the walls like the normal wall shelves as they average about a depth of 8 to 10 inches. These are perfect for arranging books such as cookery ones, plants or spices.
Traditional shelves, on the other hand has brackets exposed and are normally deeper (up to 12 inches). These are better for the dishes such as plates, and other very large and bulky kitchen utensils.
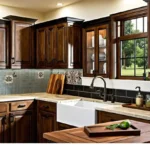
Shelving Depth for Upper Cabinets

Normally upper kitchen cabinets are likely to be between 10 to 13 inches deep. This ensures that the shelves are deep enough to fit dishes and glasses but not very deep so as to make it very difficult to reach the items at the back. Keeping open kitchen cabinets within this depth range makes it easier to organize and access everyday kitchen items without the cabinets feeling too bulky.
TIP: In upper cabinets, always store the items you use most frequently on the lower shelves to make them easier to access.
How to Measure the Ideal Depth for Your Kitchen Shelves
Before you start installing shelves, measure the space and the items you plan to store. For example, dinner plates are usually 10 to 12 inches in diameter. So, your shelves should be at least that deep. This helps you decide if standard shelves will work or if you need custom ones.
Measure Your Items
Take note of the height and depth of your plates, bowls, and glassware. This will help you choose shelves that provide enough storage space.
Consider Countertop Space
When placing shelves above countertops, make sure they don’t extend too far and limit the usable space below. A shelf that is half the depth of the countertop usually provides a balanced look without crowding the work area.
Matching Shelf Depth to Storage Needs
When choosing shelf depth, think about the items you’ll be storing. For smaller items like mugs and spices, shallower shelves of around 8 inches work well. For larger items like pots, pans, or bulky appliances, go for deeper shelves (14 to 16 inches). Matching the shelf depth to your storage needs ensures that every item has its own space and keeps the kitchen tidy.
TIP: If you’re unsure of the right depth, start by thinking about the largest item you’ll store. Your shelves should be slightly larger than this item to provide adequate space.
Factors That Affect Shelf Depth in Small Kitchens
In smaller kitchens, it’s important to choose shelf depth carefully. Deep shelves can make a small kitchen feel cramped, while shallow shelves create a more open look. If you have a small kitchen, aim for shelves that are no deeper than 8 to 10 inches. This depth will provide enough storage without making the space feel cluttered.
Open shelving can also make small kitchens appear larger by reducing the visual weight of traditional cabinets.
Related – 9 Gorgeous Small Kitchen Ideas You’ll Love
Optimal Depth for Corner Shelves
Corner shelves are a great way to maximize unused space in your kitchen. To get the most out of corner shelving, aim for a depth of 12 to 15 inches. This allows you to store larger items, such as small kitchen appliances or cookbooks, while still making use of the otherwise empty corner space.
Corner shelves are especially useful in small kitchens, where every square inch of storage counts.
How to Build DIY Floating Shelves: A Step-by-Step Guide

If you’re aiming to add floating shelves to your kitchen or any other room and want a blend of classic and functional design, this guide will help you create shelves that are both stylish and sturdy. Here’s a breakdown of floating shelves kitchen ideas to achieve a beautiful and durable result:
Materials Needed:
- 2×2 wooden boards (1.5″ x 1.5″)
- 1/4″ maple plywood
- 3/4″ maple board
- Nails
- Wood filler
- Sandpaper
- Stain (a mix of 7 parts driftwood to 2 parts dark walnut)
- Polyacrylic finish
- Drill
- Wall anchors (if not drilling into studs)
Steps:
- To start, cut the 2×2 boards to the desired length for your shelves. Once you have the boards cut, assemble them into a frame. This frame will serve as the internal support structure for your floating shelves, providing the necessary strength to hold the shelves securely. Ensuring the frame is well-constructed and sturdy is crucial for the overall stability of the shelves.
- Next, focus on anchoring the frame to the wall. Use a stud finder to locate the wall studs, as these are essential for supporting the weight of the shelves. Once you have identified the studs, mark their positions on the wall and attach the frame to the wall studs using screws or nails. It’s important to make sure the frame is level before fully securing it. A level frame will ensure that the shelves will be straight and evenly positioned.
- After the frame is securely attached, cut the 1/4″ maple plywood to fit both the top and bottom of the frame. Attach this plywood to the frame using nails. The plywood forms the surface of your shelves and will give them their basic shape and functionality. Ensure the plywood is firmly secured to the frame to provide a solid base for the shelves.
- For the finishing touches, cut the 3/4″ maple board to match the finished thickness of your shelves. Attach this board around the edges of the frame with nails. This step adds a polished, finished look to the shelves and reinforces their structure, giving them a clean and professional appearance.
- Once the shelves are assembled, proceed with finishing them. Fill any nail holes with wood filler and let it dry thoroughly. After the filler has dried, sand the entire surface of the shelves to smooth out any rough spots and prepare them for staining. Apply the stain mixture, which is a blend of 7 parts driftwood and 2 parts dark walnut, to achieve the desired color. Allow the stain to dry according to the manufacturer’s instructions. To protect the shelves from moisture and wear, apply two coats of polyacrylic finish, ensuring each coat dries completely.
- Finally, if you haven’t already done so, use wall anchors or additional screws to securely mount the shelves onto the frame. This is especially important if you are mounting the shelves on drywall. Strong wall anchors will ensure that the shelves can support heavier items without pulling out from the wall.